Some links on this site are affiliate links. We may earn a commission at no cost to you. Learn more.
How to TIG Weld Aluminum: Complete Guide
How to TIG Weld Aluminum: Complete Guide
Aluminum is one of the most challenging metals to weld, and TIG welding is the process of choice for producing high-quality aluminum welds. The combination of aluminum’s high thermal conductivity, low melting point, and stubborn oxide layer creates unique challenges that require specific techniques and equipment settings.
This guide covers everything you need to know to produce clean, strong TIG welds on aluminum — from machine setup to advanced techniques.
Why Aluminum Is Different
Before diving into technique, it helps to understand why aluminum behaves differently than steel:
- Oxide layer — Aluminum forms a thin, tough oxide coating (Al2O3) with a melting point of 3,700°F — nearly three times higher than the base metal’s melting point of 1,220°F. This oxide must be broken through for a proper weld.
- High thermal conductivity — Aluminum dissipates heat five times faster than steel. This means you need significantly more amperage to maintain the weld pool.
- No color change — Unlike steel, aluminum does not glow red before melting. It goes from solid to liquid with almost no visual warning.
- Hot cracking — Certain aluminum alloys are prone to cracking as the weld cools, requiring proper filler metal selection.
Equipment Requirements
AC TIG Machine
Aluminum TIG welding requires an alternating current (AC) output. The AC cycle performs two critical functions:
- Electrode negative half-cycle (EN) — Provides heat input to melt the base metal.
- Electrode positive half-cycle (EP) — Strips the oxide layer from the aluminum surface through a cleaning action called cathodic etching.
A quality AC/DC TIG machine like the Everlast PowerTIG 255EXT gives you full control over the AC balance, frequency, and wave shape.
AC Balance Control
Most modern TIG machines allow you to adjust the EN/EP ratio (balance control):
- More EN (60-80%) — Narrower, deeper penetration. Used on clean aluminum where oxide removal is less critical.
- More EP (50-60%) — More cleaning action but wider, shallower welds. Used on heavily oxidized or cast aluminum.
Start with 65-70% EN for general fabrication work and adjust based on your results.
AC Frequency
Frequency control adjusts how many times per second the polarity switches:
- 60 Hz (default) — Traditional frequency. Wider arc with more heat spread.
- 100-150 Hz — Tighter, more focused arc. Better for thin material and precise welds.
- 200-300+ Hz — Very narrow arc. Excellent for outside corners and thin-gauge work.
Higher frequencies give you more directional control over the arc, which is especially helpful on thin-wall tubing.
Tungsten Selection and Preparation
For AC aluminum TIG welding, use pure tungsten (green tip) or zirconiated tungsten (white tip). These resist contamination during the EP cleaning cycle better than thoriated tungsten.
Preparation steps:
- Grind the tungsten to a rounded tip — Unlike DC TIG where you want a sharp point, AC aluminum welding naturally rounds the tungsten during operation. Pre-rounding it saves time and prevents tungsten shedding into the weld.
- Use the correct diameter — Match tungsten size to your amperage range:
- 1/16” (1.6mm): up to 100 amps
- 3/32” (2.4mm): 80-200 amps
- 1/8” (3.2mm): 150-350 amps
Argon Shielding Gas
Use 100% pure argon for aluminum TIG welding. Argon provides excellent arc stability and cleaning action for AC welding. Flow rate should be 15-20 CFH through a standard #6 or #7 cup.
For very thick aluminum (over 1/2 inch), some welders add 25-50% helium to increase heat input, but pure argon works for the vast majority of applications.
Filler Rod Selection
Choosing the right filler rod is critical for aluminum weld quality:
| Filler Rod | Best For | Characteristics |
|---|---|---|
| ER4043 | General-purpose, 6xxx series alloys | Soft, flows easily, crack-resistant |
| ER5356 | Structural welds, 5xxx series alloys | Higher strength, better color match after anodizing |
| ER4047 | Automotive, thin sheet | Higher silicon content, flows very smoothly |
| ER1100 | Pure aluminum (1xxx series) | Soft, low strength, good for cosmetic welds |
For most projects, ER4043 is the best starting point. It flows well, resists cracking, and is widely available. Use ER4043 filler rod in 1/16” or 3/32” diameter for most applications.
Step-by-Step Technique
1. Prepare the Aluminum
Clean aluminum welds dramatically better than dirty aluminum:
- Remove the oxide layer — Use a dedicated stainless steel wire brush (never use one that has touched steel) to scrub the weld zone. Brush in one direction only.
- Degrease — Wipe the area with acetone or a dedicated aluminum cleaner. Do not use brake cleaner — it produces toxic gas when heated.
- Remove anodizing — Anodized coatings must be ground or sanded off completely in the weld area.
2. Set Your Amperage
Aluminum requires roughly 1 amp per 0.001 inch of material thickness as a starting point:
- 1/16” sheet: 60-80 amps
- 1/8” plate: 100-130 amps
- 3/16” plate: 140-180 amps
- 1/4” plate: 180-230 amps
Use the foot pedal to fine-tune your heat in real time. Start hot to establish the puddle quickly, then ease back to maintain control.
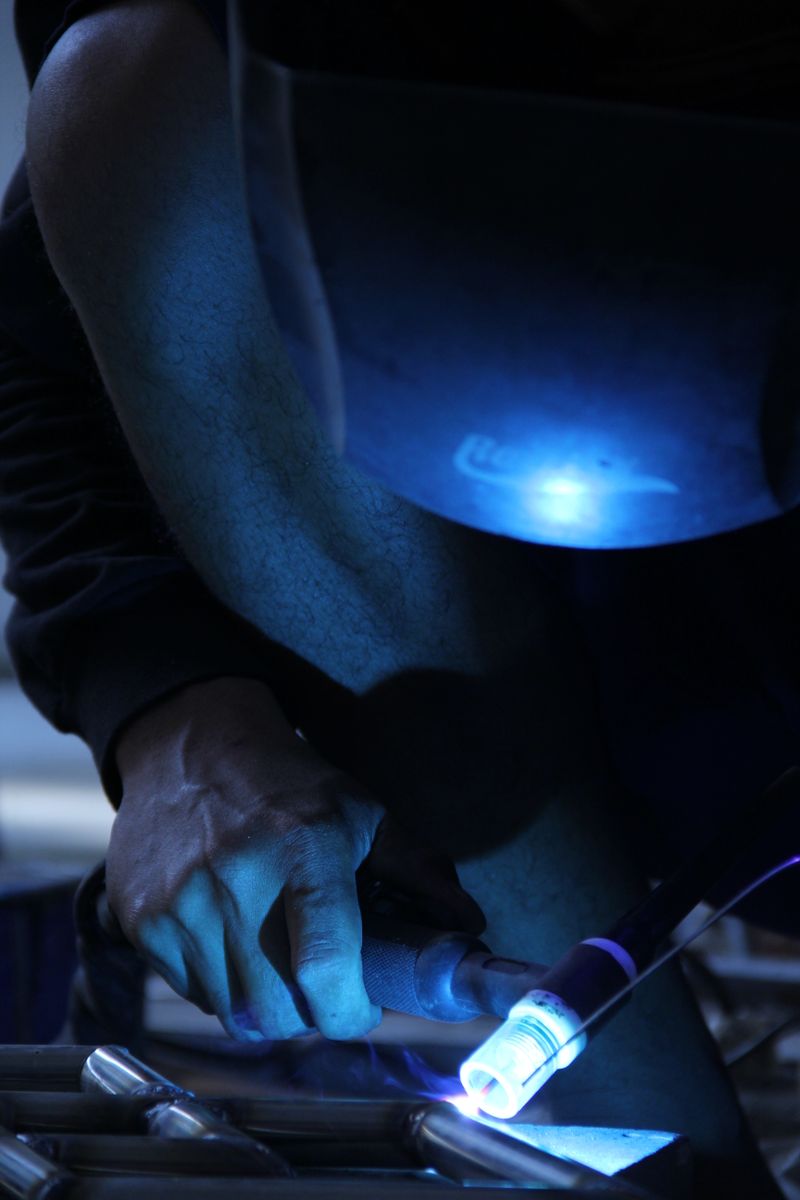
3. Establish the Puddle
- Hold the torch at a 15-degree push angle with the tungsten about 1/8 inch from the workpiece.
- Press the foot pedal to start the arc. Keep it at about 75% power initially.
- Watch for the aluminum to “wet out” — the surface will suddenly become shiny and fluid as the oxide layer breaks through.
- Do not rush this step. Aluminum takes longer to establish a puddle than steel because of its high thermal conductivity.
4. Add Filler Rod
- Once the puddle forms, bring the filler rod in from the front edge at about a 15-degree angle.
- Dab, don’t drag — Touch the filler to the leading edge of the puddle and withdraw it rhythmically. The rod should melt into the pool, not sit in it.
- Move forward slightly after each dab, maintaining a consistent travel speed.
- Keep the filler rod inside the argon shield at all times to prevent oxidation of the hot filler.
5. Control Your Travel Speed
Aluminum requires a faster travel speed than steel. The high thermal conductivity means heat builds quickly. If you linger too long:
- The puddle grows out of control
- You risk burn-through
- The heat-affected zone widens excessively
Move steadily forward, adding filler at a consistent rhythm.
Common Problems and Solutions
Problem: Sooty Black Residue
Cause: Insufficient cleaning action (EP) or contaminated argon. Fix: Increase EP percentage on your balance control. Check for gas leaks. Ensure the cup is not clogged.
Problem: Porosity (Tiny Holes in the Bead)
Cause: Contamination from oil, water, or atmosphere. Fix: Clean the aluminum thoroughly with acetone. Check gas flow rate. Ensure the cup size provides adequate coverage. A gas lens kit can improve gas coverage significantly.
Problem: Tungsten Contamination (Gray, Bubbly Tungsten)
Cause: Tungsten touching the puddle or insufficient shielding gas. Fix: Maintain proper arc length. Increase gas flow. Re-grind or replace contaminated tungsten immediately — welding with dirty tungsten transfers contamination to the weld.
Problem: Cracking
Cause: Wrong filler rod, too-slow travel speed, or lack of start/stop tabbing. Fix: Use ER4043 for crack-sensitive alloys. Weld faster to avoid excessive heat buildup. Start and end welds on run-on/run-off tabs when possible.
Problem: Lack of Fusion
Cause: Insufficient heat or oxide layer not removed. Fix: Increase amperage. Ensure thorough mechanical cleaning before welding. Increase EP balance for more cleaning action.
Tips for Thin Aluminum
Welding aluminum sheet below 1/16 inch requires extra care:
- Use a smaller tungsten (1/16”) and lower amperage (40-70 amps).
- Set AC frequency to 150-200 Hz for a tighter, more focused arc.
- Use a copper backing bar to draw heat away from the backside of the joint.
- Make short, quick tack welds to hold the joint, then connect them with a continuous pass.
- Pulse mode (if available) helps control heat input on thin material.
Tips for Thick Aluminum
For material 3/8 inch and thicker:
- Preheat the aluminum to 300-400°F using a propane torch or oxy-acetylene torch with a rosebud tip. This reduces the thermal shock and allows lower amperage settings.
- Use a larger tungsten (1/8” or larger) and a bigger cup (#8 or #10) for adequate gas coverage.
- Make multiple passes rather than trying to fill the joint in one pass.
- Allow the part to cool between passes if it becomes too hot to touch comfortably.
Final Thoughts
TIG welding aluminum rewards patience and practice. The key fundamentals are clean material, proper AC settings, consistent filler rod technique, and appropriate travel speed. Start with 1/8-inch flat stock and practice running beads until you can establish a puddle quickly and add filler smoothly. Once you master the basics on flat plate, you can progress to tubing, vertical, and overhead positions with confidence.
Related Articles
Argon shielding gas is non-negotiable for aluminum TIG welding — the understanding welding shielding gases guide explains how argon purity, helium additions for thick material, and flow rate all affect aluminum weld quality. Aluminum requires a different approach than stainless, but the two materials share the challenge of corrosion resistance — the welding stainless steel guide covers parallel concepts like heat management, contamination prevention, and dedicated tooling. If you are new to TIG and want to understand how it compares to MIG for your application, the MIG vs TIG vs stick welding comparison helps you decide which process fits your project and skill level.

Frank Ciervo
Certified Welder & Founder of The Welder's Guide
Get our free Welding Safety Checklist — delivered to your inbox.
No spam. Unsubscribe anytime.
Recommended Product
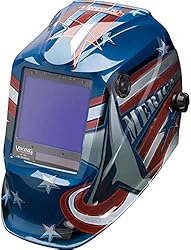
Lincoln Electric Viking 3350 Auto-Darkening Helmet
A premium auto-darkening welding helmet with 1/1/1/1 optical clarity, 4C lens technology, and a wide viewing area. Comfortable for all-day use.
- ✓ 4C lens technology
- ✓ 1/1/1/1 optical clarity
- ✓ Wide 12.5 sq in view
- ✓ Grind mode
As an Amazon Associate, we earn from qualifying purchases.
Get Your Free Welding Safety Checklist
Join thousands of readers. Expert tips and guides delivered to your inbox — no spam, ever.
No spam. Unsubscribe anytime. View our Privacy Policy.
Affiliate Disclosure
Some of the links on this page are affiliate links. If you click on one of these links and make a purchase, we may receive a small commission at no additional cost to you. This helps support our site and allows us to continue providing free content.
We only recommend products we believe in. All opinions are our own. We are a participant in the Amazon Services LLC Associates Program, an affiliate advertising program designed to provide a means for us to earn fees by linking to Amazon.com and affiliated sites.