Some links on this site are affiliate links. We may earn a commission at no cost to you. Learn more.
Welding for Auto Body Repair: MIG Welding Sheet Metal
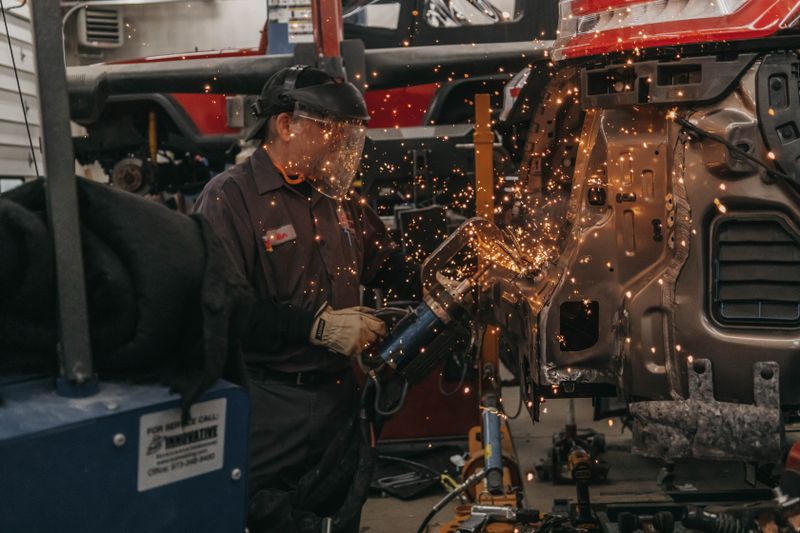
Welding for Auto Body Repair: MIG Welding Sheet Metal
Automotive sheet metal is thin — typically 18–24 gauge (0.040”–0.047”) on body panels. Welding material this thin requires different settings, technique, and patience than structural welding. Burn-through is the constant enemy, and distortion from heat can warp a panel beyond saving.
The good news: MIG welding is the ideal process for auto body repair. With the right machine, settings, and technique, you can replace rusted floor pans, repair quarter panels, and install patch panels as cleanly as factory-spot-welded construction.
Tools and Equipment for Auto Body Welding
MIG Welder
A 120V MIG welder is adequate for most auto body work. You need:
- Amperage range: 25–120 amps. Low-end output matters most — you may be running 30–50 amps.
- Wire feed range: Fine adjustment at low wire speeds is critical.
- Voltage adjustment: Fine voltage steps allow precise tuning for thin material.
Recommended: Lincoln Electric Easy MIG 140 or Hobart Handler 140.
Wire
Use 0.023-inch (0.6mm) ER70S-6 wire for 18–24 gauge sheet metal. The thinner wire requires less heat for fusion and is easier to control on thin material. Most welders default to 0.030” wire — switch to 0.023” for body work.
The Lincoln Electric .023” ER70S-6 wire is reliable and widely available.
Shielding Gas
Use 75/25 Ar/CO2 (C25). This standard MIG gas blend produces a smoother, softer arc than 100% CO2, which is important for thin sheet metal work. 100% CO2 is too aggressive for thin gauge work.
Panel Clamps and Magnets
Fit-up before welding determines weld quality. Invest in:
- Bessey auto body panel clamps — hold panels in position during tacking
- Magnetic welding squares — quick positioning for corners and edges
- Locking C-clamps — general purpose
Angle Grinder and Weld Finishing Tools
- 4.5” angle grinder with grinding discs and flap discs
- Eastwood flexible flap disc — contours to panel shapes
- Body filler spreaders
Understanding Automotive Welding Joints
Factory Spot Welds
Factory automotive assembly uses resistance spot welding — two electrodes squeeze the metal together and pass current through. This creates the round “nuggets” you see when stripping old panels. Spot welds appear in flanged joints throughout the car body structure.
When replicating factory spot welds with a MIG welder, you use plug welding.
Butt Joints
Used when installing patch panels and floor pan sections. The new metal is trimmed to fit flush with the existing metal, and the seam is welded from the back side or with a stitch weld technique.
Lap Joints
Used in factory construction for many body panels. One panel overlaps another, and spot welds are placed through the overlap. MIG plug welding replicates this joint.
Plug Welding: Replacing Factory Spot Welds
Plug welding is how you replicate factory spot welds with a MIG welder. It is the standard technique for installing new body panels, floor pans, rocker panel replacements, and any other spot-welded joint.
Plug Weld Technique
- Drill plug weld holes in the outer (new) panel. Use a 5/16” or 3/8” drill bit. Space holes to match the original spot weld spacing (typically 1” to 1.5” apart).
- Prepare surfaces — Remove all paint, rust, and coating from both mating surfaces in the weld zone. Apply weld-through primer (zinc-rich) to the inner mating surface before assembly.
- Clamp the panels together so there is no gap between them.
- Set MIG settings for plug welding thin sheet metal:
- Wire: 0.023” ER70S-6
- Voltage: Start at position 1 or 2 (approximately 16–18V)
- Wire feed: Start at 3–4 (approximately 150–200 IPM)
- Weld the plug hole: Point the MIG gun into the hole. Start at the edge of the hole, not the center. Move in a circular motion from the edge inward, filling the hole completely. Stop when the hole is filled flush or slightly proud.
- Allow cooling between plugs. Do not weld adjacent plugs back-to-back — alternate every other hole to distribute heat.
- Grind flush with a flap disc after all plugs are complete.
Stitch Welding: Butt Joints on Sheet Metal
Stitch welding is the technique for welding butt joints on thin sheet metal. Instead of running a continuous bead (which would warp the panel), you weld short tack beads and allow the metal to cool between each.
Stitch Weld Technique for Butt Joints
- Cut and fit the patch panel so the gap between old and new metal is 0 to 1/16 inch. Zero gap is ideal — use a cutoff wheel or snips to fine-tune the fit.
- Tack weld the patch in place at 4–6 inch intervals. These tacks hold position but do not complete the weld.
- Stitch weld the seam in short 1/2-inch to 1-inch beads:
- Weld one short bead
- Skip 2–3 inches
- Weld another short bead
- Allow to cool to touch (100–120°F maximum interpass temperature)
- Repeat until the seam is complete
- Alternate your starting position — work from the middle outward, then from the ends in. Never run a long continuous bead on sheet metal.
- Check for panel flatness frequently. If the panel begins to bow, stop and allow more cooling.
- Back-step where possible — working in short segments from right to left reduces cumulative distortion.
Managing Heat and Distortion
Heat is the enemy of flat panels. Use these strategies:
- Wet rag adjacent to the weld — damp cloth placed 2–3 inches from the weld absorbs heat and reduces the spread of the heat-affected zone. Do not quench the weld itself.
- Keep a spray bottle of water nearby to cool the panel between passes.
- Planishing hammer — immediately after each short stitch bead, lightly planish (hammer) the weld bead with a body hammer and dolly to relieve thermal stress before it causes distortion.
- Low amperage — if the panel is warping, reduce amperage and shorten your bead length.
Welding Settings for Auto Body Sheet Metal
Use this chart as a starting point and fine-tune based on your results:
| Material Gauge | Approximate Thickness | Voltage | Wire Feed Speed | Wire Size |
|---|---|---|---|---|
| 24 gauge | 0.024” | 14–16V | 120–170 IPM | 0.023” |
| 22 gauge | 0.030” | 15–17V | 140–180 IPM | 0.023” |
| 20 gauge | 0.036” | 16–18V | 160–200 IPM | 0.023” |
| 18 gauge | 0.047” | 17–19V | 180–230 IPM | 0.023” |
Signs your settings are wrong:
- Burns through — amperage too high, wire speed too low, or travel too slow
- Weld sits on top, no penetration — amperage too low or travel too fast
- Excessive spatter — voltage too low relative to wire speed, or dirty metal
Rust Repair Welding: Working with Compromised Metal
Rusted auto body panels present unique challenges. Thin rust can compromise the metal thickness so severely that even correct settings cause burn-through.
Rules for welding near rust:
- Cut out all rusted metal — do not try to weld to rusted material. The rust-weakened base metal cannot support the weld.
- Find solid metal — test thickness with a pick tool. If the metal deflects or penetrates easily, cut further into solid material.
- Reduce settings further for very thin remaining sections
- Use stitch welds, not runs — never run a bead next to compromised metal
The Eastwood rust converter stabilizes surface rust on areas adjacent to welds before priming.
Finishing Auto Body Welds
After welding, body welds need finishing:
- Grind flush with a 36-grit grinding disc on an angle grinder. Avoid grinding too deep — remove weld crown only.
- Finish with a flap disc — 80-grit to smooth the surface without creating valleys.
- Check for pinholes — any porosity in the weld will rust through later. Identify and re-weld pinholes before finishing.
- Apply body filler if needed — for minor surface irregularities, body filler over properly welded and primed metal is acceptable.
- Apply self-etching primer immediately after grinding. Bare metal oxidizes quickly.
For structural welds (floor pans, frame rails), use seam sealer on the backside of any seam that will be exposed to water or road salt.
Safety for Auto Body Welding
- Fire watch: Upholstery, fuel lines, and fuel tanks are fire hazards. Never weld near the fuel system without draining and purging the tank. Remove nearby upholstery and carpeting.
- Ventilation: Auto body finishes and body filler off-gas toxic compounds when heated. Work with adequate ventilation and wear a respirator.
- Eye protection: Auto-darkening helmet is essential. Spatter and UV radiation damage eyes.
Auto body welding rewards patience and preparation. Take time on fit-up, use correct settings, and control heat — the result is invisible repairs that last as long as the original steel.

The Welder's Guide Team
Certified Welder & Founder of The Welder's Guide
Get our free Welding Safety Checklist — delivered to your inbox.
No spam. Unsubscribe anytime.
Recommended Product
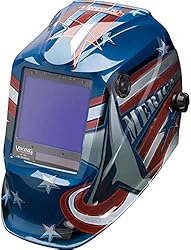
Lincoln Electric Viking 3350 Auto-Darkening Helmet
A premium auto-darkening welding helmet with 1/1/1/1 optical clarity, 4C lens technology, and a wide viewing area. Comfortable for all-day use.
- ✓ 4C lens technology
- ✓ 1/1/1/1 optical clarity
- ✓ Wide 12.5 sq in view
- ✓ Grind mode
As an Amazon Associate, we earn from qualifying purchases.
Get Your Free Welding Safety Checklist
Join thousands of readers. Expert tips and guides delivered to your inbox — no spam, ever.
No spam. Unsubscribe anytime. View our Privacy Policy.
Affiliate Disclosure
Some of the links on this page are affiliate links. If you click on one of these links and make a purchase, we may receive a small commission at no additional cost to you. This helps support our site and allows us to continue providing free content.
We only recommend products we believe in. All opinions are our own. We are a participant in the Amazon Services LLC Associates Program, an affiliate advertising program designed to provide a means for us to earn fees by linking to Amazon.com and affiliated sites.