Some links on this site are affiliate links. We may earn a commission at no cost to you. Learn more.
Essential Welding Jigs and Fixtures for Accurate Fabrication
Essential Welding Jigs and Fixtures for Accurate Fabrication
Jigs and fixtures are the difference between a fabrication shop that produces consistent, accurate work and one that produces close-but-not-quite results. A jig positions workpieces in the correct relationship before welding; a fixture holds them there while the weld is made. The time invested in building or buying good jigs and fixtures pays back in quality, speed, and repeatability on every subsequent job.
This guide covers the essential jigs and fixtures for a welding shop, from simple magnetic squares to purpose-built welding fixtures.
What’s the Difference: Jig vs. Fixture?
The terms are often used interchangeably in welding shops, but technically:
Jig: A device that guides a tool or positions a workpiece for measurement or layout. A jig locates but does not necessarily clamp.
Fixture: A device that holds and clamps a workpiece in position during manufacturing. A fixture clamps and restrains.
In practical welding use: a welding fixture positions and holds parts for tacking and welding, preventing movement from weld distortion.
Why Jigs and Fixtures Matter
Without fixtures, parts shift during tacking (especially on the first tack), distort during welding, and require rework to achieve specified dimensions.
Key benefits of proper fixturing:
- Accuracy — Parts are held in exactly the right position every time
- Repeatability — Multiple identical parts can be made to the same dimensions
- Distortion control — Clamped parts have less freedom to warp
- Speed — Less time spent measuring, repositioning, and re-tacking
Basic Clamping Tools
Every welding shop needs a collection of general-purpose clamps before specialty fixtures are considered.
Locking C-Clamps (Vise Grips)
The most versatile welding clamp. Use them for:
- Holding work to the welding table
- Clamping parts together for tacking
- Providing a third hand when positioning parts
Recommended: Irwin Vise Grip Original 9R locking clamps — the original and most reliable locking clamp.
C-Clamps
Fixed C-clamps provide more holding force than locking clamps and are better for high-force clamping situations.
Recommended: Bessey 3700 series C-clamps — heavy-duty construction that handles welding loads.
F-Clamps (Bar Clamps)
F-clamps with a sliding head allow rapid adjustment for varying work sizes.
Recommended: Irwin Quick-Grip bar clamps — fast, one-handed operation for positioning.
Magnetic Welding Clamps and Squares
Magnetic fixtures are among the most useful tools for a welding shop. They require no physical clamping action — they simply stick to the steel workpiece and hold it in position.
Standard Magnetic Welding Squares
Magswitch Multi-Angle magnetic clamps are the shop standard. They hold steel at precise angles (45°, 90°, 135°, etc.) for tacking corner joints, T-joints, and mitered connections.
Features to look for:
- Strong neodymium magnets (50+ lb pull force for production use)
- Multiple preset angles (most common: 45°, 90°, 135°)
- On/off switch (invaluable — allows positioning without the full magnetic force engaging until you are ready)
- Ground contact surface — allows ground clamp attachment
The Magswitch 8100550 Welding Magnet Set (pack of four) is the most useful starting set.
Limitation: Magnets cannot be placed directly in the weld zone — they must be positioned away from the weld, and the magnetic field can affect arc stability if too close.
Magnetic V-Blocks for Pipe and Round Stock
Magnetic V-blocks hold pipe and round stock on a flat surface or at right angles to flat stock. Essential for:
- Positioning pipe sections for tacking
- Aligning round stock to plate
- Holding tube at specific angles
Recommended: Strong Hand Tools Magnetic V-Block set
Corner and Angle Fixtures
90° Corner Clamps
Right-angle corner clamps hold two pieces of tube or flat stock at a precise 90° for tacking box frames, table legs, and any square corner.
Strong Hand Tools 3-Way Corner Clamp — Holds three intersecting pieces at 90° simultaneously. Invaluable for building box frames and square structures.
Bessey WS-3 3-Way Right Angle Clamp — Traditional 90° corner clamp with independent adjustment on each jaw.
Framing Square
A large framing square is essential for checking 90° angles during assembly. Use it to verify that tacked assemblies are square before fully welding.
Recommended: Empire Level 3994 aluminum framing square
Angle Finder / Digital Protractor
When welding at angles other than 90°, a digital protractor lets you set up jigs at any angle precisely.
Recommended: GemRed digital angle finder — measures angles to 0.1° accuracy.
Pipe and Tube Alignment Tools
Pipe Alignment Clamps
Pipe alignment clamps (also called “chain clamps” or “lineup clamps”) hold two pipe sections in alignment for tacking. They prevent pipe sections from shifting radially or axially during tacking.
External pipe clamps: Wrap around the outside of both sections and pull them into alignment.
Recommended: Mathey Dearman Type E pipe lineup clamp — the industry standard for pipe alignment.
Internal lineup clamps (hydraulic): For pipe 4” and larger, internal lineup clamps expand inside the pipe and align both sections from the inside while holding the root gap open. Used by professional pipe welders on large-diameter pipe.
Pipe Welding Positioners
For shop work on pipe, a simple pipe welding positioner (also called a “rollout stand”) allows the pipe to be rotated so the welder works in the flat (1G) position throughout.
Two-roll pipe stands positioned under each end of the pipe allow manual rotation. For production shop pipe welding, powered positioners (Koike, Profax, Lincoln) allow hands-free rotation at controlled speed.
Hold-Down Clamps for Welding Tables
Step Clamps (Mitee-Bite Style)
Step clamps have a stepped clamping surface that engages at different heights. They slide in table slots and pull the workpiece flat to the table surface.
Recommended: Mitee-Bite Machinable Fixture Clamps — fit 5/8” T-slot tables.
Toe Clamps
Toe clamps push against the side of the workpiece and pull it flat to the table simultaneously. Simple, adjustable, and very effective.
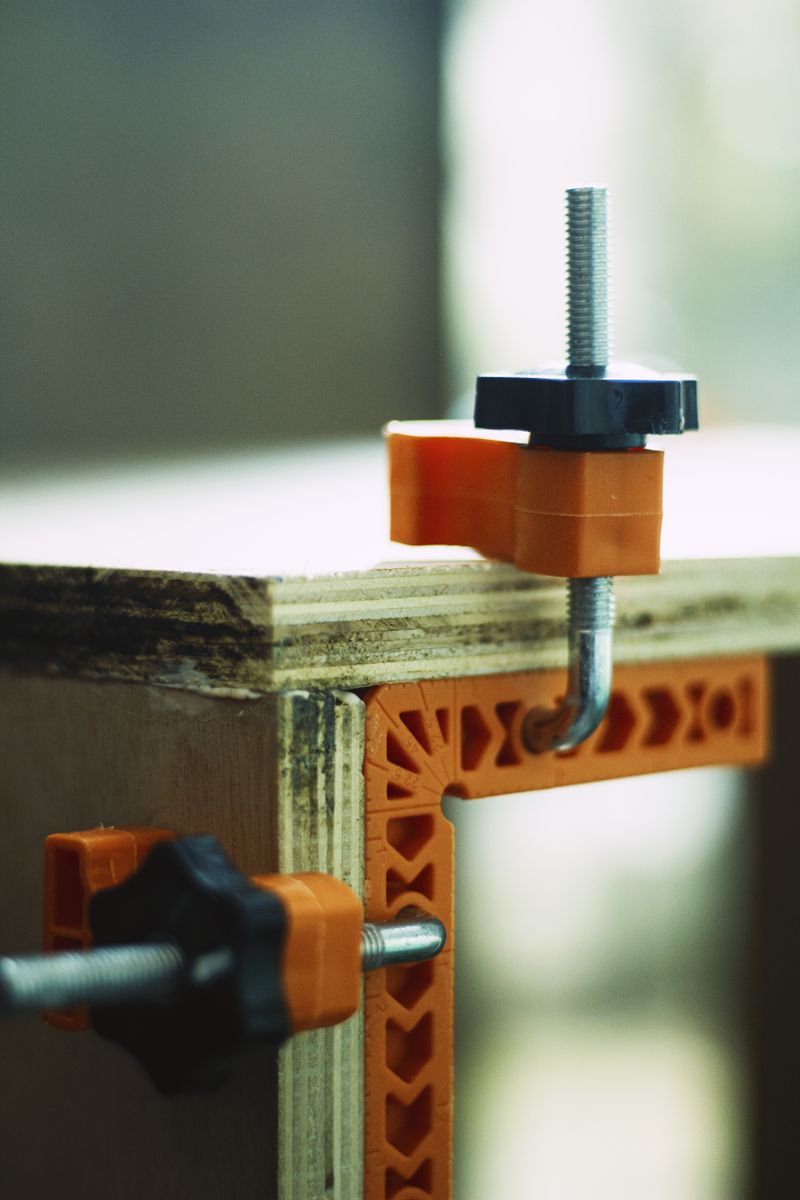
Commercial Fixture Systems
Purpose-built modular fixture systems provide a set of components that can be assembled into virtually any fixture configuration on a slotted table:
Stronghand Buildpro — Popular slotted table and fixture system for fabrication shops. Demmeler — Professional German fixture system used in high-precision fabrication. Certiflat — American-made welding table with integrated fixture holes.
These systems are expensive ($500–$3,000 for a basic set) but dramatically improve setup time and accuracy on repetitive work.
Building Custom Welding Jigs
For any project that will be produced in multiples (railings, gates, brackets, frames), building a custom jig is almost always worth the time.
Steps to Build a Simple Welding Jig
1. Identify the critical dimensions. What measurements must be consistent part to part? These are your datum points.
2. Build the base. A piece of 1/4” flat plate (or your welding table itself) serves as the jig base. The base must be flat.
3. Add locating stops. Weld short blocks of steel at positions that represent the outside edges of each part. These stops locate the parts consistently, part after part.
4. Add hold-down points. Add clamp attachment points (holes or slots) to hold parts against the stops without movement.
5. Test the jig. Dry-fit the parts in the jig. Check dimensions against your spec. Adjust the stops if needed.
6. Mark the jig. Label critical dimensions, part numbers, and revision information on the jig.
Example: Simple Gate Frame Jig
For a production gate frame (repeated production of 4’ x 6’ gates):
- Start with a 4-foot x 6-foot section of flat plate or tube frame on your welding table.
- Weld 2-inch blocks at each corner to locate the frame members.
- Add clamps at each corner to hold the corners tight against the blocks.
- Set frame members in the jig, clamp, and tack.
- Move the tacked frame to the welding table to complete welding.
Every gate produced in this jig will be identical within the tolerance of the jig construction.
Welding Clamp Quick Reference
| Tool | Best Use |
|---|---|
| Locking C-Clamp | General positioning, quick setup |
| Magnetic welding square | Tacking corner joints, T-joints |
| Pipe alignment clamp | Pipe section tacking |
| Corner fixture (3-way) | Box frames, square tube structures |
| Step clamp | Holding flat plate to welding table |
| Magnetic V-block | Pipe and round stock positioning |
| Commercial fixture system | Precision, high-volume production work |
Final Thoughts
The time invested in proper fixturing is not time lost — it is time spent on every future part from that jig. Even a simple jig built in 30 minutes saves more time than it costs on the fifth part, and continues paying dividends on every subsequent piece.
Start with the basic magnetic squares and a good set of locking clamps. As your shop grows and you produce more repetitive work, invest in commercial clamp systems or build custom jigs for your most common jobs. A well-organized fixturing system is as important to shop quality as the welder itself.

The Welder's Guide Team
Certified Welder & Founder of The Welder's Guide
Get our free Welding Safety Checklist — delivered to your inbox.
No spam. Unsubscribe anytime.
Recommended Product
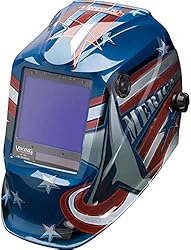
Lincoln Electric Viking 3350 Auto-Darkening Helmet
A premium auto-darkening welding helmet with 1/1/1/1 optical clarity, 4C lens technology, and a wide viewing area. Comfortable for all-day use.
- ✓ 4C lens technology
- ✓ 1/1/1/1 optical clarity
- ✓ Wide 12.5 sq in view
- ✓ Grind mode
As an Amazon Associate, we earn from qualifying purchases.
Get Your Free Welding Safety Checklist
Join thousands of readers. Expert tips and guides delivered to your inbox — no spam, ever.
No spam. Unsubscribe anytime. View our Privacy Policy.
Affiliate Disclosure
Some of the links on this page are affiliate links. If you click on one of these links and make a purchase, we may receive a small commission at no additional cost to you. This helps support our site and allows us to continue providing free content.
We only recommend products we believe in. All opinions are our own. We are a participant in the Amazon Services LLC Associates Program, an affiliate advertising program designed to provide a means for us to earn fees by linking to Amazon.com and affiliated sites.